Ace down the T

Ace down the T

Claremont Lawn Tennis Club, Perth, Australia

Its an honor to be the Club Coach at Claremont Lawn Tennis.

We have 12 grass courts, 4 hard courts and 2 Tiger Turf. You can come here and make us a visit. You will be welcomed!

Would you like to have a lesson and maybe have your shots recorded with a high speed video camera?

just give me a call on : 0478 524 382

or send me an email: vazpintotennis@mail.com


Tuesday, September 20, 2022

Tony’s One Handed Backhand


This are Tony's one handed Backhand. Its a beautiful shot with lots of great elements in common to all the pros one handers. However after studying the videos we can be aware of some things that could make the shot more consistent. 

When analyzing videos its good to see lots of different videos to better know your patterns on different shots. Would be great to see your videos from a different angle too, perhaps on a future post!

I've uploaded 7 shots. The first video and video number 6 are the worst shots. You were extremely late on both. Shots 2,3,4,5 are ok but could be better!. Shot number 7 is the best and could be better as well.

Before analyzing your videos one by one and point out where they differ from each other is good to point out first the elements that were common to all the videos. That way we can have a general understanding of this great one handed backhand. 

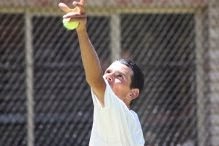
The first thing that I noticed is how your hands stay very low during the first stages of the preparation. As you first step back with your left foot, your hands are still low and your racquet is very horizontal. This next picture is the moment the ball bounces on the court. This is one of the most important moments of all the players shots. I like to call it the power position.


Pic 1


You have the weight of the body on the left foot and you are about to step in to the ball with your right foot transferring all your body weight to the front foot. You have rotated your shoulders to the net, but you could have rotated a bit more, maybe 10 to twenty per cent more. The great problem of this position is that you haven't used the rotation of your shoulders to prepare the racquet to start your forward swing. You are going to raise your racquet higher than your head and your left and right hands are going up. All of this happens after the ball bounce which is a big problem. No wonder you were late on this shot!

 See the next picture to see the point of your whole swing where your racquet and hands were higher: 


Pic 2


If you look at those last two pictures you can see the major element you can improve on your one hander: LATE PREPARATION!!

Focus on those two pictures and imagine you could maintain the hands and racquet where they are on the second picture with the same feet position of the first picture. That is how you could be by the time the ball bounces on your side. Your power position.

You could probably lower the right hand more and keep the racquet more vertical and closer to the head like Federer, but there is nothing wrong in having the racquet where you have it as long as you get it there earlier. As I mentioned before, the fact that you've started your preparation with your hands and racquet low doesn't help either because you are elevating your hands and racquet too much and that costs you too much time. 

You have a big swing, your racquet goes higher than your head. It is possible to have a big swing like that, but you have to make sure that your hands and racquet reach that position about the same time that the ball bounces!

These last two pictures are taken from Video number 1. By looking at picture two you can see how much higher the racquet is in relation to the ball. You still need to drop the racquet, get to the trigger position, and hit the ball in front. Problem is that the ball is not waiting for you to do all that!!

Because you are late on your preparation, that makes you step back a lot to gain time. If you look at those two pictures again notice how your left foot is actually pointing backwards on an angle even on the first pic. Its like your feet already knew that you were late on pic 1 and were preparing your body for that late shot. Notice that from picture 1 to picture two, your right foot has stepped back closer to the back fence than it was on pic one. 

1


This next shot, you had to hit an open stance Backhand because you were running late. Although your racquet seems a bit more vertical on the moment the ball bounces your rotation is not good enough and your body weight is back towards the back fence. Then after the ball bounce you raise the racquet and specially the right hand which makes your shot become more difficult to execute. You open up your stance which in this case is a good idea since you are running so late. 


2


This next video is a better shot. Because the oncoming ball is shorter and slower you had more time available to hit it. Although you are still late on your preparation, you had time to make a big step forward with your right foot. 
3


This next video is quite good.  Interestingly your racquet reaches a much lower position at the end of the backswing. The shot looks much more compact than all the other videos. You are still a little bit late and you could have a better rotation on your power position, but overall is much better!!
You hit this backhand on the rise and you just seem slightly late on contact. Your left foot in the air at contact point and after is great for balance.
4


This next shot is very good. Again a more compact swing where your right hand and the racquet don't go too high at the end of the backswing which allows the racquet to drop earlier on the forward swing. Contact is beautiful in front of the body! Great follow through. Your footwork was a bit passive and you could have stepped in more forwards with your right foot as opposed to closing the stance so much.
5


Oops, this next video is not good! The position that you are starting, with your right foot in front, side on without much rotation with your hands extremely low, you're asking for trouble. Its very important to load and rotate with the weight on the left foot. You mishit on contact because you were a bit late dropping the racquet under the ball on the forward swing.
6


This is a much better Backhand! Now you're starting your rotation loading on the left foot. Although you are still late, notice how you step back again with your right foot. You have much better rotation than the previous video. To see the difference lets watch at the following pictures: 

Picture 3 is taken from the video 6 where your contact went very bad. Picture 4 from video 7.

Although the right foot step is better on pic 3, the rotation is much worse. Notice how you can see much more strings on the racquet on picture 3 and how the shoulders are much more rotated on picture 4. 

Picture 4 we almost cant see the strings and that allows a much better trigger position just before impact. Again combining both pictures would be ideal. The forward step of picture 3 combined with the rotation and trigger position of pic 4 would be great.

Pic 3


Pic 4


7


And that's it Tony, great backhands. I love the follow through, the left hand back on the finish, the head still at contact, the right arm fully extended at contact. Preparation and footwork are the key elements to improve your backhands. Cant wait to see your new improved weapon!


Friday, August 26, 2022

Brett’s Forehands - Beware with the new weapon in town!

 This is your Forehands Brett.  From the first shots we’ve noticed how your right elbow was so tucked in to the body. You’re improved that in less than 10 minutes and your shots at the end looked so much better. Great improvement!


01: First Forehand of the day: 

The loading of the shoulders only got to 90 degrees to the net, almost perpendicular ðŸ˜ģ

Very Good wide open Stance 😀😀

Good grip 😅

Solid wrist at contact 👌👌

Late preparation on the bounce of the ball.  ðŸ˜Đ

Right elbow very low on the loading and turn of the shoulders 😎

Right elbow very low and extremely tucked into the body at contact and follow through which causes very limited extension on the follow through ðŸĪŠ


02;Second Forehand

You’ve improved your rotation! Your shoulders have turned more than perpendicular to the net!!👋👋

Although the ball didn’t go over the net you seem to have more acceleration through the ball 👍

Stance is ok, but  bit close to the ball. ðŸŦĪ

Left hand across is even closer to the body than on the first shot 🙄

Much better shot overall! 😀


03: Third Forehand:


Pointing your index index finger on the grip ðŸ˜ĐðŸ˜ĐðŸŦĢ

Less rotation than on the second shot ☹️

 Very late preparation on the bounce ðŸĪŊ

Left hand is more across the body 😇

Right elbow is a bit less tucked in to the body. 😅

Contact more in front of the body ☺️

Shot number 2 still the best one.


004: forehand number 4


No pointing with the index finger please Brett ðŸŦĢ

Great preparation!! Notice how you’ve prepared Better on the bounce of the ball! 🏆

Rotation not as good as the second shot but acceptable. 😊

Right elbow high on preparation 🙂

Left hand more across the body 😁

Right elbow still tucked in at contact ðŸ˜Ē

Great acceleration through the ball. Better extension and wind screen wiper! ðŸ”Ĩ

Best forehand! 💎 


Shots number 5 and 6:


The index finger is not pointing anymore!! 👍👍😁

Right elbow high on the load of the shoulders 👍

Good Shots Brett ðŸ”ĨðŸ”Ĩ


Shot number 7:

Fixed index finger on the right hand! 😋
Rotation could be better 🧐
Left hand across the body is further out 👍👍
Right elbow is still tucked in 😏
You’ve opened the racquet head on contact and that’s why the ball went up to the sky ðŸĪ­
You can even catch the racquet up with your left hand on the finish position 👌👋👋
Overall a very good swing,


Shot number 8,9 and 10

Right elbow Up,, earlier preparation, better index finger on the grip, contact in front, catching the racquet at the end. 

Much better shots!  It’s starting to look easier! ðŸ”ĨðŸ”Ĩ


Shot number 11

Another great shot! That one looked much more relaxed!! 😇😇 Your body seemed more balanced as you’re hitting the ball. 🏆🏆 

Still work in progress, but it’s getting hotter and hotter.

Check now your first forehand and compare it with your last one! It’s a huge improvement 😋😋

 Great forehands Brett ðŸ”ĨðŸ”ĨðŸ”Ĩ


Thursday, July 7, 2022

Matt’s Forehands

 There you go Matt, these were your Forehands as first recorded on the 5th of June. You may have improved it already but nevertheless let’s break it up in parts to understand it better.

I’ve highlighted two major ares to improve your Forehand:

Stance

Trigger Position


001


The first thing I notice when looking at your shots, specially the ones recorded from the side angle is how far back you are on the court. You’re not too far away from hitting the back fence with your racquet. Because of that you are not optimising your open stance. 

The stance is how we position our feet at the end of our backswing. After we commit to our stance we are loaded and ready to start our forward swing towards contact to the ball.

We basically have 4 good different stances that we use on our forehands:


Neutral Stance, when we step in to the ball with the inside foot (left foot for right handlers)

Semi Open Stance, when we position our feet with the outside foot closer to the side fence and the back fence. It’s a mixture of a step back and a step out with the outside foot. This stance is probably the favourite of the pros because allows more time for contact, and maximum rotation. 

Open Stance, when we position our feet at the same distance to the net. Although we have less rotational power than a semi open stance it is easier to make contact more in front of the body. Players may have to use the open stance because the incoming ball might be short but not giving enough time to step in to it or step back to a semi open stance. It’s  typical stance for return of serves.

Extreme open stance, when we position the outside foot forwards stepping in to the ball. This is not a desirable stance since by opening up our hips we lack rotation and power, but we might have to play it when retrieving low, short and angled shots into our forehands. 

So now let’s see why your Open Stance doesn’t really suit the shots yore hitting. 

002


With the open stance your right foot is positioned at the same distance to the baseline as your left. Because of that it is very difficult for you to turn your hips since your right knee and foot are blocking the hips rotation. Since you are so far back into the court you should have plenty of time to step in with your left foot. Of course a better alternative for you would be to be closer to the baseline and as the ball approaches you, you could deliver a more semi open stance by stepping back and out with your right foot. 
Interestingly on your rear side view videos you are a bit closer to the baseline and although we can’t really see your feet we can guess that your stance is not much different than these side view videos. 

Your unit turn is very good Matt, your left hand stays with the racquet and goes far back as you turn your shoulders. Your left shoulder is tucked underneath your chin at the end of your backswing, looks great!

This next picture I got from your next video. I’ve frozen it just at the time that your left hand is coming off the racquet. From this picture imagine stepping forward into the ball with your left foot (neutral stance). Maybe even a couple of side steps before committing to the contact. You would rotate and be more side on to the ball and it would be for sure a winner!


It might seem that you are exaggerating the left hand back a little bit, but I think it’s ok!  It’s helping you rotating your body a lot. You are loaded! You have successfully turned your shoulders more than perpendicular to the net. Because you have plenty of time, now you need to step in to the ball with your left foot keeping your racquet still up, before dropping it and unleash all that installed power! 
You should only hit that shot in that open stance  from so far behind the baseline, as you did on the video, if the incoming ball was shot at you at 250 km/h

003


Instead of stepping in you have waited passively on that open stance and then because the ball is dying in front of you, you were forced to move your body forward towards the contact. Notice the low contact point. 

004


From the back view, we can be aware of the other major element of your forehand that needs some improving! 

I call it the trigger position!! It’s basically when we prepare the wrist for contact. It typically happens a few moments before contact. The wrist should be laid back for impact. When it happens the racquet head tends to go into the inside just before contact. We normally say to line up the butt of the racquet in the direction of the ball. Here’s Fed’s trigger position on the forehand:


Whiteout this trigger position the wrist is not ready for impact. What happens between the Trigger position and the contact point is one of the most crucial and fundamental elements to master the Forehand.

As the wrist is laid back and ready, the hand leads the racquet into the direction of impact. In those very fast moments before the impact, if the racquet head moves faster than the right hand, then the wrist’s back position is compromised and the player won’t be able to have a solid contact and extension into the line of the shot.  Very often a poor extension after contact and a poor follow through are signs of a weak wrist at contact. 

Notice on the following pictures, how after the trigger position is achieved on the first pic, the right hand is still in front of the racquet head up until contact happens. We want the right hand and the racquet head levelled or with the hand slightly in front of contact, but not with contact in front of the right hand! (Maybe except for extreme wristy shots like angle passing shots or shots on the run?…) 

 Notice how on the last picture at contact, Fed still has his right hand in front of his contact point:


So the wrist is kept laid back in a strong position where it’s able to absorb the impact of the ball on the strings and it’s kept back for a few more moments after impact to ensure the shot has maximum extension. Then after the follow through the wrist relaxes and therefore the racquet finishes up and on the outside and left of the right hand. 


Looking at your wrist at contact we can see how it’s not entirely laid back. It’s not as strong as it should be. It even seems that the contact point is in front of your right hand:


005


But to understand better how to improve your forehand Matt, let’s see what happens right after contact:


And now let’s see Fed’s after contact wrist position:


AMAZING!! Notice how the wrist is still back. The hand seems to be still in front of the centre of the racquet head. His right arm is almost fully straight and his hand is far away from the body. By reaching this position with his wrist still laid back Fed has an amazing extension through the line of the shot.

Notice how on your picture after contact, the racquet head goes in front of the right hand. A sign that your wrist has gone neutral too early, therefore you’re lacking extension and power. 

So that’s it Matt, the stance and the Wrist are your most important elements to improve on your forehand. You’ve got the footwork and the rotation and unit turn. You use quite well the left hand. The next step after that is to have the left hand more stretched out when you’re preparing your forward swing, but that can wait…     Good luck! 

006


Monday, July 4, 2022

Pierre’s Backhand Part II

 This is some of the videos that I took two days after the first recordings :


01


This is a much better shot than any of the other videos that I recorded you before.

(see previous post). 

I think your grip is stronger than the older videos. Although it’s not exactly clear it seems that your right hand knuckles are a bit more parallel with the handle of the racquet than on your previous videos.  However I still think you can rotate your knuckles more to make your backhand grip stronger.


Notice how on these videos your racquet head was much higher and vertical than before and your contact was much more in front too. However you can still work on that!

In my view these are the main priorities to improve your backhand:

1 - Grip (already discussed see previous post)

2 - Racquet head vertical and closer to the shoulder at the end of the backswing and unit turn and holding on to that position even while stepping to the ball ( view Brett’s Backhand post):


3 - Trigger position where the racquet is horizontal and parallel to the baseline with the strings facing the back fence:


4 - Contact point much more in front of the body. How to have that early contact??

 Starting with a stronger grip, and then having the racquet more vertical at the end of the unit turn and while stepping to the ball, we should just use gravity as the way to smoothly achieve some relaxed acceleration, while the racquet falls into the trigger position, following then towards the contact in front.

5 - Keeping the head and shoulders relaxed and still through contact and right after contact. The shoulders should stretch, and the hitting arm should remain fully stretched during the follow through. By keeping the left hand back to the back fence and the head still from contact point till the end of the follow through keeps the shoulders perpendicular to the net:


I leave you now with your pictures during all of these time frames of your swing for comparison: 

End of the backswing: (try having your racquet more vertical with left hand directly above the right hand and maybe with the racquet closer to your left shoulder)


Trigger Position: (try having your racquet horizontal and parallel to baseline. Strings towards the back fence. Imagine that you want to hide the strings from the camera!): 


Contact point in front (your contact point seems good. Much better than in your previous videos. With a stronger grip you will be able to have a contact even more in front while keeping your wrist comfortable:


Follow through (Try maintaining the arm fully stretched with the racquet head still on the left side of the right hand, maintaining your head still)


Overall seems much better Pierre! Keep visualising those important elements and I can’t wait to see the evolution of your one handed backhand!


Followers